中文内容
开发实时视觉 AI 应用对开发者来说是一项重大挑战,通常需要复杂的数据流水线、海量代码以及漫长的开发周期。
NVIDIA DeepStream 9 通过 Claude Code 或 Cursor 等编码代理消除了这些开发障碍,帮助你轻松创建可部署、经过优化的代码,让你的视觉 AI 应用更快落地。
这种新方法简化了构建复杂多摄像头流水线的过程,这类流水线可摄取、处理并分析海量实时视频、音频和传感器数据。DeepStream 基于 GStreamer 构建,是 NVIDIA Metropolis 视觉 AI 开发平台的一部分,可加速开发者在各行业从概念到可执行洞察的过程。
视频 1。如何使用 NVIDIA DeepStream 编码代理,通过 Claude Code 从自然语言提示生成完整的视觉 AI 流水线。
要观看使用 Claude Code 或 Cursor 构建 DeepStream 视觉 AI 流水线的录制演示,请点击此处。
使用 NVIDIA Cosmos Reason 2 构建视频分析应用
可以使用 NVIDIA Cosmos Reason 2 构建一个视频分析应用,同时摄取数百路摄像头流,并使用视觉语言模型(VMA)分析这些流。NVIDIA Cosmos Reason 2 是面向物理 AI 的最准确、开放的推理型 VLM。
该应用可动态扩展,无需为添加摄像头或更换模型而浪费重新部署时间,也无需猜测瓶颈所在。编码代理能够理解你的硬件,并生成针对该硬件优化的应用。
只需几行提示词,就可以在一次开发会话中生成一个完整的生产级微服务,包含 REST API、健康监测、部署自动化以及 Kafka 集成。
如何生成由 VLM 驱动的视觉 AI 应用:
步骤 1:为 Claude Code 或 Cursor 安装 DeepStream Coding Agent 技能。你可以在任何地方生成代码,但部署需要 GitHub 上列出的最低硬件配置。
步骤 2:将下面的提示词粘贴到你的代理中,以生成一个可扩展的 VLM 流水线,支持动态 N 路流摄取和按流批处理。
Implement a Python application that uses a multi-modal VLM to summarize video frames and sends summaries to a remote server via Kafka.
Architecture:
  1. DeepStream Pipeline: Use DeepStream pyservicemaker APIs to receive N RTSP
     streams, decode video, and convert frames to RGB format. Process each stream
     independently — do not mux streams together.
  2. Frame Sampling & Batching: Use MediaExtractor to sample frames at a
     configurable interval (e.g. 1 frame every 10 seconds). When the VLM supports
     multi-frame input, batch sampled frames over a configurable duration (e.g.
     1 minute) before sending to the model. Each batch must contain frames from a
     single stream only.
  3. VLM Backend: Implement a module that receives a batch of decoded video frames
     and returns a text summary from the multi-modal VLM.
  4. Kafka Output: Send each text summary to a remote server using Kafka.
  Constraints:
  - Scalable to hundreds of RTSP streams across multiple GPUs on a single node.
    Distribute processing load across all available GPUs.
  - Never mix frames from different RTSP streams in a single batch.
  Store output in the rtvi_app directory.
  Also generate a README.md with instructions to setup kafka server, vLLM, and
  how to run the application.
你可以自定义帧采样间隔等参数(例如每 10 秒 1 帧);Cosmos-Reason2-8B 不施加固定帧数限制,它使用较大的上下文窗口(最高 256K token),并根据 fps 和分辨率动态采样帧。
步骤 3:现在你已经有了一个可运行的应用,接下来让它具备部署就绪能力。再输入一条提示词,你就可以将其转换为完整的生产微服务,配备可动态管理流的表述性状态转移(REST)API、用于编排的健康探针、用于可观测性的指标、用于容器化的 Dockerfile,以及可在数分钟内运行起来的部署脚本:
Need to create microservice for the app in @rtvi_app directory. Follow the
  steps below to complete that.
  - Create FastAPI based server and implement the endpoints mentioned in the
    attached image @rtvi_vlm_openapi_spec.png.
  - Create dockerfile to package the everything together which can later be used
    to generate docker image.
  - Create deployment guide to run the microservice.

  IMPORTANT
  - Need to generate production ready code and don't create dummy implementation for any of the endpoint.
  - Update the code in @rtvi_app if it is required for having the working
    implementation of the endpoints.
步骤 4:生成的代码将包含部署脚本,并可通过 http://localhost:8080/docs 上的 Swagger UI 或 curl 访问 API。你可以预期看到一个类似 GitHub 上该页面的页面。
使用任意模型生成高效的实时 CV 应用
现在我们再进一步。假设你想使用 YOLOv26 这样的开源模型构建实时应用。要将任意模型接入 DeepStream,你需要了解三件事:
- 输入张量——形状和缩放方式(例如 [batch, 3, 640, 640],对像素进行归一化)
- 输出张量——输出张量的名称和形状(例如 [batch, 300, 6],其中每一行是 [x1, y1, x2, y2, conf, class_id])
- 后处理——从原始模型输出中提取最终检测结果所需的任何操作,例如非极大值抑制(NMS)是内置在模型中,还是需要作为模型最后一层之后的后处理步骤。
你可以从模型卡中获取这些信息,也可以使用 Netron、VisualDL、Zetane 等任何模型可视化/检查工具,或者直接运行 onnx.load() 并打印图的输入/输出形状。也可以跳过这些步骤,直接将模型文件提供给编码代理——它会为你检查模型,并拉取模型检查所需的正确库。
可以这样理解:你将一个自定义模型带入 DeepStream 的硬件优化视频分析流水线。你介绍这个模型——它的输入形状、输出格式——DeepStream 则负责其余部分;通过高效的缓冲区管理,充分利用 GPU 解码、计算和下游处理,从而交付你的硬件所能达到的最佳延迟。
使用 DeepStream 编码代理生成 YOLOv26 检测应用的步骤如下:
步骤 1:确保你已安装 DeepStream Coding Agent 技能,并具备用于部署的最低硬件配置。为 Claude Code 或 Cursor 安装 DeepStream Coding Agent 技能。你可以在任何地方生成代码,但部署需要 GitHub 上列出的最低硬件配置。
步骤 2:将此提示词粘贴到你的代理中:
Download the YOLO26s detection model using the ultralytics library, then convert the model to ONNX model that supports dynamic batch, in a Python virtual environment. Write a DeepStream custom parsing library for the model. Use DeepStream SDK pyservicemaker APIs to develop the python application that can do the following.
 - Read from file, decode the video and infer using the model.
 - The custom parsing library is used in nvinfer's configuration file.
 - Display the bounding box around detected objects using OSD.
 Save the generated code in yolo_detection directory.
 The app should support RTSP streams as input.
步骤 3:代理会生成一个包含多个文件的完整应用——模型下载脚本、流水线应用、推理配置文件等。
我们重点关注与模型集成相关的文件:推理配置文件。你需要了解的三件事(输入张量、输出张量和后处理)在推理配置文件中的具体位置如下:
输入张量:这会告诉 DeepStream 如何预处理上游 GPU 缓冲区——调整为 640×640,并将像素值按 1/255 缩放——然后将其馈送给 TensorRT。ONNX 文件会在首次运行时自动转换为 TensorRT 引擎,并针对你的具体 GPU 和批大小进行优化。
推理配置将包含:
  infer-dims=3;640;640
  net-scale-factor=1/255
  onnx-file=yolo26s.onnx
输出张量和后处理:代理会生成一个 NvDsInferParseCustomYolo 函数,用于读取名为示例 output0 的输出 blob(在 yolo26s 中为 [300, 6] 张量,其中每一行是 [x1, y1, x2, y2, conf, class_id]),并将每个检测结果转换为 NvDsInferObjectDetectionInfo 结构体。
extern "C" bool NvDsInferParseCustomYolo(
      std::vector<NvDsInferLayerInfo> const &outputLayersInfo,
      ...
      std::vector<NvDsInferObjectDetectionInfo> &objectList)
  {
      // Find output layer "output0" → [300, 6]
      ...
      const float *det = data + i * 6;
      // [x1, y1, x2, y2, conf, class_id]
      obj.classId = static_cast<unsigned int>(det[5]);
      obj.detectionConfidence = det[4];
      obj.left = det[0];  obj.top = det[1];
      obj.width = det[2] - det[0];  obj.height = det[3] - det[1];
      ...
      objectList.push_back(obj);
  }
这会填充下游 NvDsBatchMeta 中的 ObjectMeta。推理配置将包含:
custom-lib-path=nvdsinfer_custom_impl_yolo/libnvdsinfer_custom_impl_yolo.so
parse-bbox-func-name=NvDsInferParseCustomYolo
output-blob-names=output0
步骤 4:要将其转换为生产微服务——就像上面的 VLM 应用示例(步骤 3)一样——使用类似提示词来添加用于流管理的 FastAPI 端点、健康探针、指标、Dockerfile 和部署脚本。
步骤 5:使用生成的脚本进行部署,并通过 http://localhost:8080/docs 上的 Swagger UI 或 curl 访问 API。
这两个应用只是开始。同样的技能可以生成任何 DeepStream 流水线——从多摄像头跟踪,到音频分析,再到自定义推理链。
请在代码库中查看更多示例提示词。可将这些作为参考,为你能想到的任何视觉 AI 应用编写自己的提示词:
- 使用 4 个 RTSP 摄像头和拼接显示进行多流跟踪
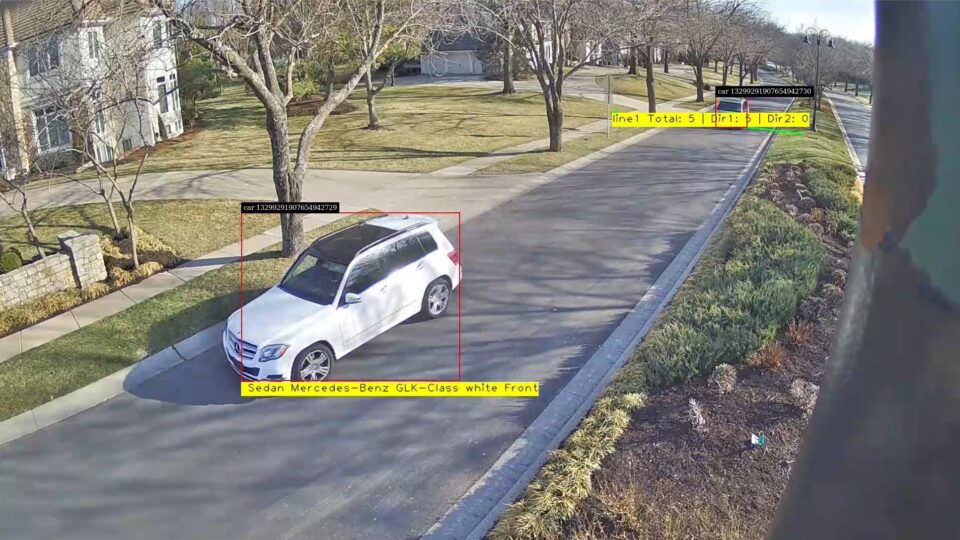
- 分析——ROI 过滤、越线、过度拥挤和方向检测
- 带边界框显示的视频文件推理
- 按类别统计对象数量的视频推理
- 使用自定义 ONNX 导出和解析器的 YOLOv26s 检测
- 使用 Kafka 的多流 VLM 视频摘要
- 带 Dockerfile 和部署的 FastAPI 微服务封装
重新定义视觉 AI 开发
DeepStream 通过代理式工作流加速视觉 AI 开发,将编码时间从数周缩短到数小时。借助自然语言提示,开发者可以即时接入模型、配置摄像头流并部署分析应用。DeepStream 针对 NVIDIA 硬件进行了优化,与通用流水线相比,每美元可提供更多流和分析能力,从边缘到云端最大化性能。
开始使用
在 NGC 上下载适用于 Jetson、数据中心 GPU 或云端的最新 SDK,开始使用 DeepStream。
资源
- 下载 DeepStream
- 文档
- GTC 2026 实验室点播
标签